Bagpipe Underground | New to Bagpipes?
You've assembled the practice chanter, found your hand position, and gotten Low G and Low A to speak. You're holding two notes. The bagpipe has nine. This article walks you through the rest of them, hands you a chart you can keep in front of you while you play, and then sends you off to find the kind of real-time feedback a written article cannot give.
That last part matters. We can show you what each note looks like and what each one is supposed to sound like. We cannot listen to you while you play. That is the part a teacher does, and it is the part where the real progress lives.
9 Notes. That's the Whole Instrument.
Every instrument has a scale. A set of notes, arranged low to high, that defines what the instrument can do. The bagpipe has one too. But if you are expecting it to work like the instruments you have seen before, you are in for a surprise.
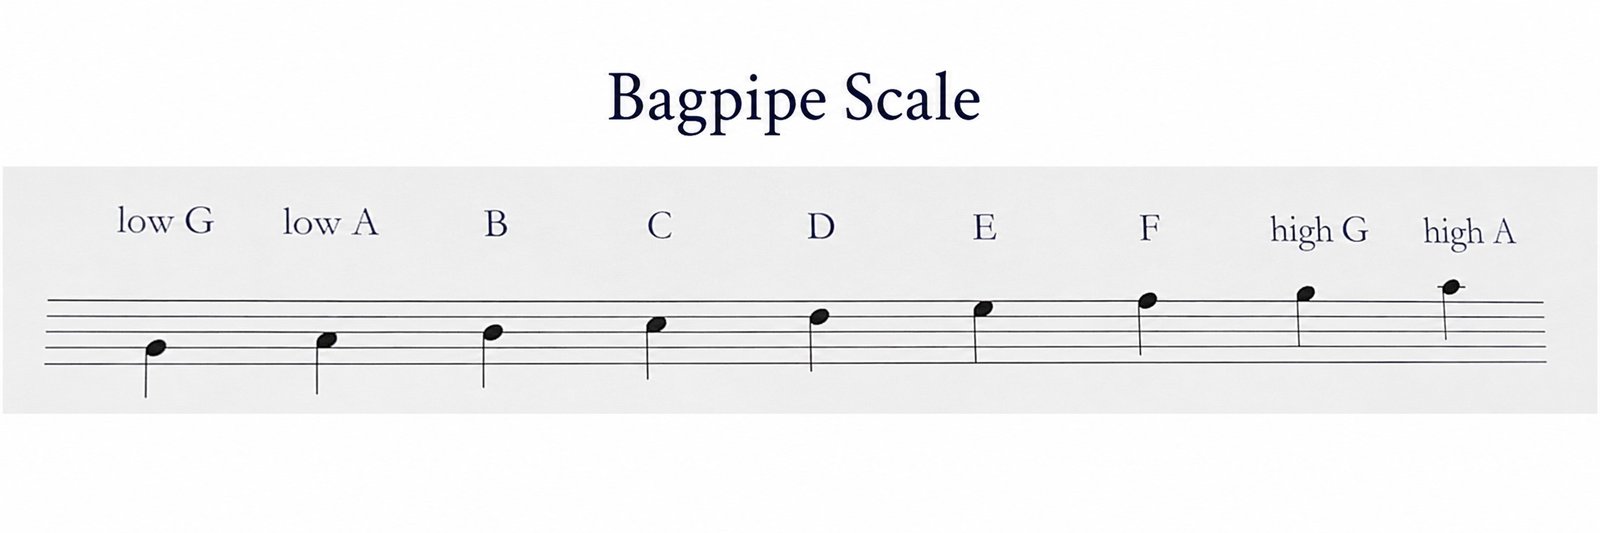
The Great Highland Bagpipe has nine notes. Not eighty-eight like a piano. Not dozens of possible positions like a guitar. Nine. From lowest to highest:
Low G, Low A, B, C, D, E, F, High G, High A.
That is it. Every bagpipe tune ever written uses some combination of those nine notes. From the simplest beginner march to the most complex piobaireachd (a word you will eventually learn to pronounce), the notes are always the same. The instrument does not change key. There are no sharps, no flats, no accidentals.
On most instruments, a limited range would be a limitation. Bagpipe music does not get its complexity from a wide range of notes. It gets it from what the piper does within those nine notes: rhythm, expression, and embellishments, which are quick precise finger movements between notes that create articulation in a sound that never stops. More on those in a moment.
The Names, and Why They Matter
The note names are simple. Low G. Low A. B. C. D. E. F. High G. High A. The "Low" and "High" prefixes exist because there are two G's and two A's, roughly an octave apart, and you need a way to tell them apart in conversation and on paper.
These names are universal in the piping world. When an instructor says "play a D," every piper on the planet knows exactly which note that is and exactly which fingers to lift. When you read bagpipe sheet music, these names appear. When you watch a tutorial, listen to a lesson, or read a forum thread about fingering, these are the terms everyone uses. Learning them now means you can communicate with any piper anywhere about what you are playing.
You do not need to read music to play the bagpipes. Every published tune is written down, though, and learning to follow along on paper opens up a much bigger library than learning by ear alone.
A Tuning System All Its Own
Getting a bagpipe "in tune" is different from getting most other instruments in tune. We are sparing you the full musical-theory tour for now (terms like temperament, mixolydian, and pitch are real concepts you will eventually meet, but they are not what is keeping you up at night today). For practical purposes as a beginner, two things matter.
First, do not worry if your practice chanter does not sound "in tune" compared to a piano or a guitar tuner app. It is not supposed to. The bagpipe lives in its own tuning system, and trying to match it to a piano is like trying to translate poetry word for word. The result is technically correct and completely wrong.
Second, as your ear develops over weeks and months, you will start to hear what "in tune" means inside the bagpipe's own system. That is a different and more interesting skill than matching standard pitch, and it is one of the things a good teacher will start training in you almost immediately.
How the Fingerings Work
On the practice chanter, each note corresponds to a specific combination of covered and uncovered holes. You have already played two of them: Low G with all holes covered, and Low A with the right pinky lifted off its hole.
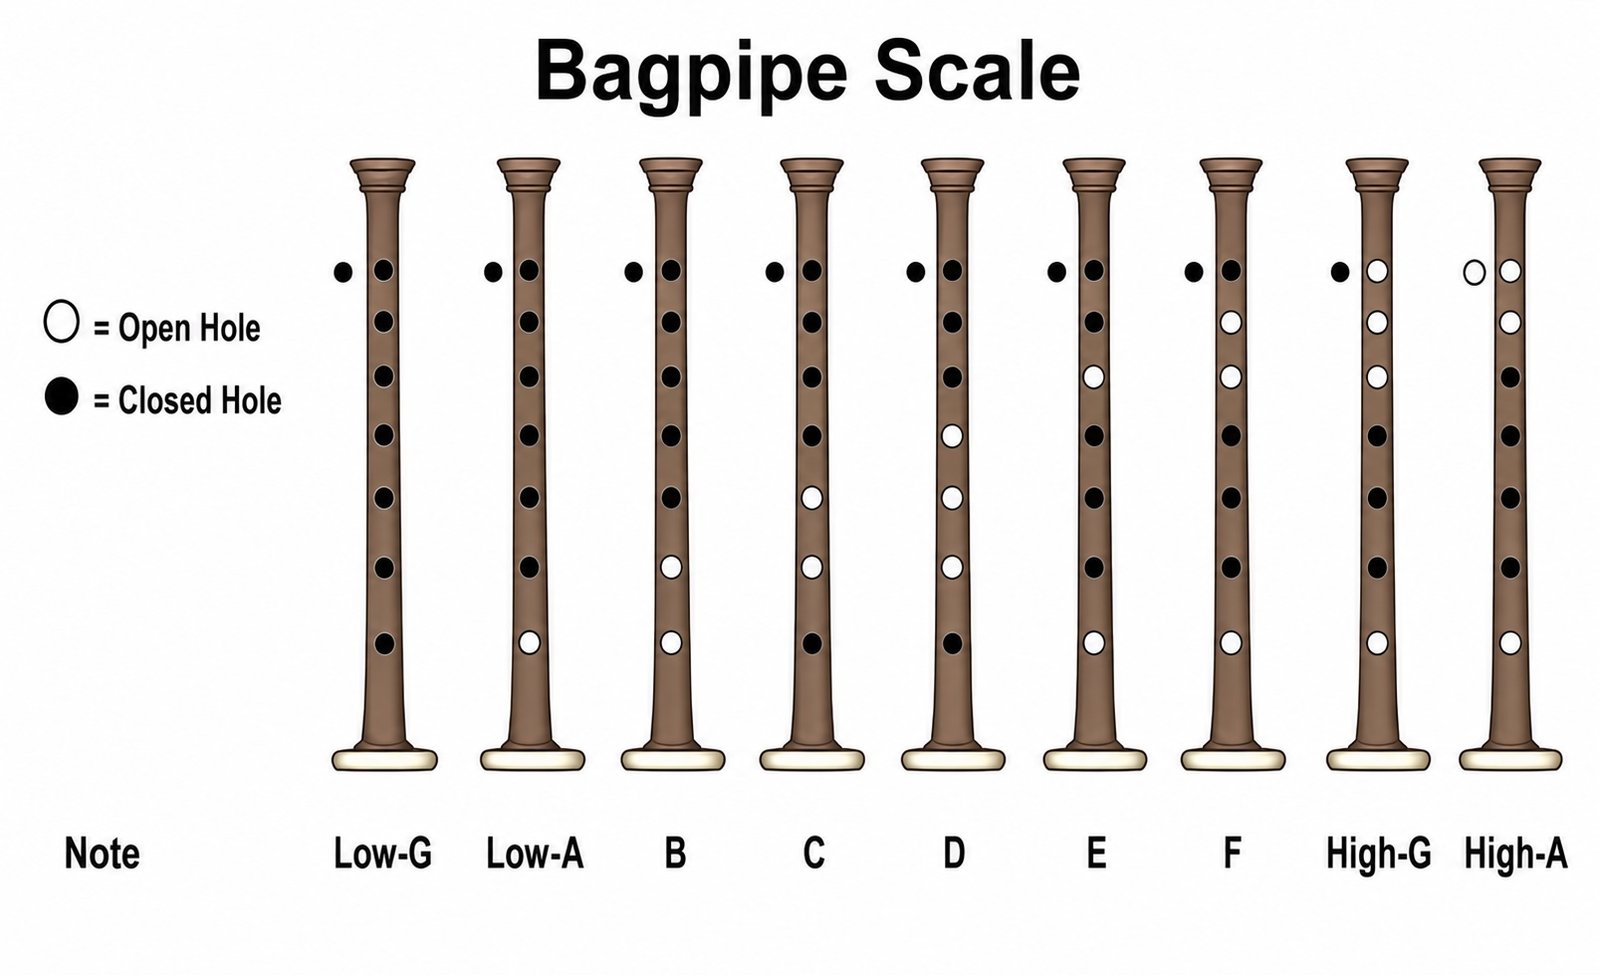
The pattern from there follows a clear logic. As you move up the scale from Low G to High A, you generally lift one finger at a time, working your way up from the bottom of the chanter to the top. Right hand fingers come off first, then left hand fingers, then finally the left thumb on the back. There are a couple of spots where the pattern is not strictly one-finger-at-a-time, but the overall logic is consistent. It is not random. There is a system.
That system is what the chart below shows. Each note has its own diagram. A filled circle means "this hole is covered by your finger." An open circle means "this finger is lifted clear of its hole." The back of the chanter (where the left thumb sits) has its own indicator on each diagram.
Print the chart, prop it up next to your practice spot, and treat it as the answer key for everything that follows.
Walking the Scale with the Chart in Front of You
Here is the order of operations. Take the chart and play through this slowly. The goal is not speed. The goal is making each note speak cleanly before you move on.
Start at Low G. All eight holes covered, including the back thumb hole. Steady breath. Hold for five counts. This is your home base.
Lift to Low A. Right pinky comes off its hole. Everything else stays put. Hold for five counts. Move back to Low G. Then back to Low A. You are confirming you can move between two adjacent notes without the sound collapsing in the transition.
Move to B, C, D in sequence. Each step lifts one more right-hand finger working upward: ring, then middle, then index. By the time you reach D, the entire right hand should be off the chanter and only the left hand and the left thumb on the back are covering holes. Take time at each note. Hold five counts. Move down. Move up. The right hand will feel less coordinated than the left hand at first, because the left hand is doing less. That balances out with reps.
Move to E, F. The left hand starts coming off, again working upward: ring, then middle. Your left thumb is still on the back. Your left index is still covering its hole near the top of the chanter.
Move to High G. Left index lifts. The only fingers on the left hand covering anything is the left thumb. Note that your right hand pinky is also off the chanter.
Move to High A. Left thumb comes off the back and the left ring stays on the instrument holding down its spot. This is the highest note you will ever play on the bagpipes.
Then walk it back down the same way, hole by hole, finger by finger. Up the scale, down the scale, slowly. This is your daily warmup for the next several weeks.
What Tends to Trip Beginners Up
The nuances can be many and subtle, and most of them are best worked out with an instructor watching your hands. One concept worth flagging now is crossing notes: jumping across the scale in a single motion (Low A straight to High A, say) rather than stepping up one note at a time. Crossing cleanly is harder than it looks and is exactly the kind of subtlety an instructor will walk you through.
The Sound No Other Instrument Makes
The practice chanter will give you a thin reedy approximation of the scale. The full bagpipe, when you eventually move to it, will sound nothing like that. The bag, the drones, and the larger chanter reed turn the same nine notes into the rich resonant sound you have heard at parades and funerals and tattoos.
Bagpipes are also a continuous-sound instrument. Once you start blowing into a full set of pipes, sound is produced constantly. There is no silence between notes the way there is on a piano or a guitar. Every transition from one note to another is an audible connection rather than a clean break.
This is why bagpipe music has embellishments. Embellishments are quick precise finger movements between notes that create the audible separation a sustained instrument otherwise lacks. They are how the piper articulates phrases, accents beats, and gives a tune its rhythm. They are also a major part of what makes the bagpipe sound like a bagpipe and nothing else.
You are not going to learn embellishments here. They are part of the technique a teacher walks you through once your scale is solid and your steady tone is reliable. For now, knowing they exist and knowing what they are for is enough. The reason every bagpipe tune you have ever heard sounds the way it does is partly the nine notes, and partly what trained pipers do between them.
The End of What We Can Teach Here
The nine notes you just walked through are the same nine notes that every great piper in history has played, in the same tuning, with the same fingerings. Robert Hardie, Donald MacLeod, Gordon Duncan, the piper at the head of the procession at Queen Elizabeth's funeral. All of them, on those nine notes. There is a direct line from your practice chanter to the pipes you hear at Highland games. The distance is skill and time, not complexity.
Spend the next several weeks on this scale. Up. Down. Slowly. Pay attention to which notes speak cleanly and which ones do not. Pay attention to what your hands actually do versus what you think they are doing. Record yourself if you can stand to listen back. Recording is one of the few honest mirrors a beginner has.
And then, when you are ready to keep going, find a real teacher.
This is where Bagpipe Underground hands you off. The next section of the site is "What About Real Lessons?", and it is where we lay out the four real options: a one-on-one in-person teacher, an online program, a pipe band that teaches beginners, or self-teaching with discipline. Those four guides are still being written. While they come together, the Resources page already has the schools, the books, the podcasts, and the regional pipe band associations those guides will point at. You can start there today.
What we cannot do, no matter how many words we put on a page, is hear you while you play. We cannot tell you that your right pinky is drifting or that your D is going sharp or that your transition from C to D is rushed. A teacher will hear those things in the first ten minutes of a lesson and save you weeks of bad habits.
The nine notes are yours. The next move is finding the person who can listen.
Or head back to Beginner Articles to see the whole map.