Bagpipe Underground | New to Bagpipes?
You have a practice chanter. You have assembled it carefully, avoided touching the reed, and possibly stared at it for a few minutes wondering what comes next. This is that article.
What comes next is figuring out how to hold the thing without creating tension, discomfort, or habits that your future self will have to spend months unlearning. That last part is more important than it sounds. The way you position your hands and body in these early sessions is going to become automatic very quickly. You want automatic to mean correct, not approximately correct.
The good news: holding a practice chanter is not complicated. There are really only a few things that matter, and once you have them, your hands will find their way.
Sit Down First
Start seated. Every beginner should learn on the practice chanter while sitting down, and most experienced pipers still use a chair for practice sessions. Sitting lets you focus entirely on what your hands and mouth are doing without also managing posture, balance, and everything else that standing introduces.
Sit up straight in a chair -- not rigid, not slouched. Both feet flat on the floor. The goal is a relaxed, stable base. If you're hunched over or twisting to one side, your arms will compensate in ways that show up as tension in your hands. Sit up, settle in, and then pick up the chanter.
Which Hand Goes Where
Here is the rule, and it is non-negotiable.
Left hand on top. Right hand on bottom. This is not a preference. This is how bagpipe fingering works, and getting it reversed will cause real problems when you eventually move to the full instrument.
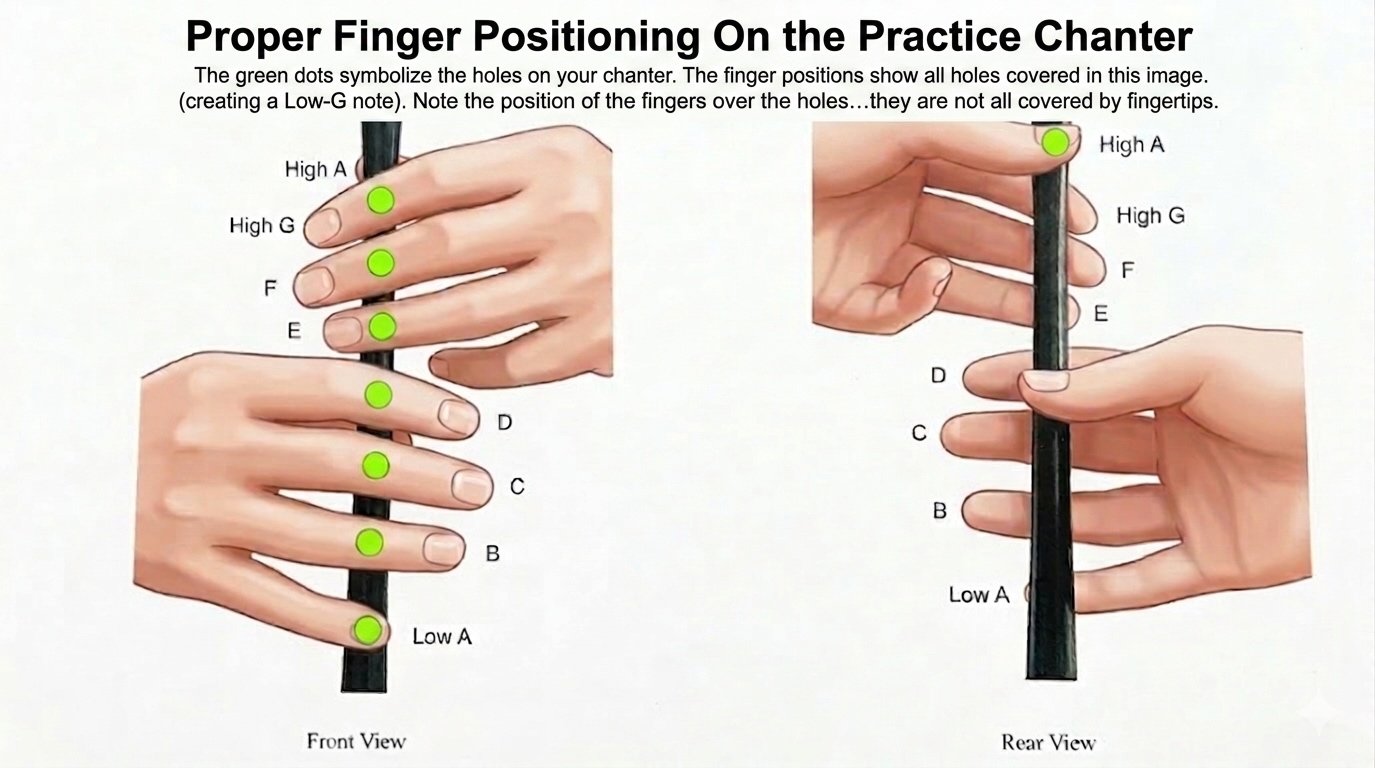
The top hand -- your left -- covers the top three holes on the face of the chanter plus the single hole on the back. The index finger, middle finger, and ring finger of your left hand are responsible for holes one, two, and three from the top. Your left thumb covers the hole on the back. And your left pinky? It has nothing to do. Enjoy it while it lasts.
The bottom hand -- your right -- covers the remaining four holes on the face of the chanter. Index, middle, ring, and pinky fingers, in order going down. On the practice chanter, you'll use all four fingers of the right hand.
What about the right thumb? No hole to cover -- but it still has a job. Its role is to stabilize the chanter while your other fingers move. Pay attention to where it rests on the back of the instrument. Too high, too low, or gripping too tightly will all create problems down the road. It should sit lightly and consistently in the same place every time.
How to Cover the Holes
This is where most beginners develop their first bad habit, and it's also where a teacher earns their keep in the first five minutes.
Each hole needs to be covered completely and cleanly. A partially covered hole is not a covered hole -- it will produce a squeak or a note that doesn't speak properly, and you may not even hear the problem at first because you don't yet know what the note is supposed to sound like.
Pay attention to where the fingers actually sit on the holes. Use the flat pad of your finger, not the tip. The pad is the soft, slightly fleshy part of your finger below the tip. When you place it on the hole, it should seat flat, with no gaps around the edges. Press down with enough firmness to seal the hole, but not so much that your hand is tense. A good contact point with a relaxed hand is the goal.
A common check: cover all the holes, blow into the chanter, and lift one finger slightly without fully removing it. If the note changes, your seal was good. If nothing happens, you weren't fully covering the hole to begin with.
The angle of your fingers matters too. Your fingers should come down onto the holes from a slight curve, not reach across from the side. Think of them approaching the chanter from above, hovering slightly, then dropping straight down. If you're stretching sideways to reach a hole, you're setting up for tension that will slow you down later.
A note on individual variation. The flat pad instruction is standard teaching, and it's the right place to start. That said, there's real variation in how teachers describe it, and players with smaller or larger hands sometimes arrive at a slightly different contact point that works for their anatomy. If your teacher has a different cue that produces better results for you, trust them over this text. The principle is clean coverage with a relaxed hand -- however you get there.
The Chanter Angle and Your Arms
Hold the chanter in front of you at a slight downward angle -- maybe 45 degrees from vertical. Your elbows should be relaxed and away from your body, not pinned to your sides. Think of holding it like you're about to read a document you're slightly interested in, not like you're clutching a steering wheel in a snowstorm.
The mouthpiece goes into your mouth, not onto your lips. Seal your lips around the mouthpiece gently. You're not gripping it with your teeth. You're not clamping it with your jaw. You're creating a light, even seal so that the air you push through it goes into the chanter and nowhere else.
Your head should be up. Eyes forward. Resist the urge to look down at your fingers. You are not going to be able to see your fingers and play at the same time in any useful way, and trying to watch them creates neck tension and a dropped head position that will feel wrong the moment someone corrects it. Look ahead. Trust your hands. They'll figure it out.
One drill worth practicing: place your fingers onto their proper holes without looking at the chanter. Start from one end and work your way to the other. For example, going top-down -- place your left thumb and index finger first, look away, then feel your way down to seat the remaining fingers in order. Going bottom-up -- place your right pinky on the lowest hole first, look away, then work back up the chanter from there. Do this a few times per practice session. It won't take long before you can find every hole without glancing down, which is exactly where you want to be.
Tension Is the Enemy
Before we go any further: check your hands right now. Are they tense? Is your grip tighter than it needs to be? Are your shoulders up around your ears?
They probably are, at least a little. This is normal. Your body doesn't know what it's doing yet, so it defaults to trying harder, which for most people means gripping harder, hunching more, and generally throwing effort at a problem that requires relaxation instead.
Bagpipe fingering demands fast, clean, precise movements. Fast and tense do not coexist. If your hands are tense, your fingers are slow, your lifts are sticky, and your embellishments (when you get to them) will never come clean.
The practice: every few minutes, consciously release. Let your hands go slack for a moment. Shake them out. Then come back to the chanter with a lighter grip. Do this regularly until the lighter grip is your default.
A Note on Fingernail Length
Keep your fingernails short on both hands. This is not aesthetic advice. Long fingernails prevent the finger pad from making flat, clean contact with the holes. If you're covering the holes with your fingertips instead of your pads because your nails are pushing the finger off the flat position, you will have coverage problems and potentially develop an uncomfortable hand angle to compensate.
Short nails. It's a small thing that matters more than you'd expect.
What to Practice First
Before you try to play a note, just hold the chanter. Seat your fingers on the holes. Feel where each finger lands. Do it a few times without even blowing into it.
Then try covering all the holes and playing the lowest note -- Low G. This is the note you get with all holes covered. Listen to it. Hold it steady. Practice going from all holes covered to lifting just your right pinky finger (that's Low A) and back down. Don't rush it. You're not training for speed right now. You're teaching your hands where the holes are.
That's enough for your first session. Seriously. Fifteen minutes of this done correctly is worth more than an hour of pressing forward before your hands know what they're doing.
Coming up next: you can hold it, and you can cover the holes. Now it's time to make a sound on purpose. Read Making Your First Sound: Tone, Breath, and Not Passing Out.